Choosing Your Calligraphy Style: A Beginner’s Guide
It’s exciting that you’re considering picking up a new hobby—arguably the best one! Before you start, we need to determine which type of calligraphy interests you. Throughout history, there have been many different scripts in calligraphy.
We’ll break it down into five basic, unofficial categories, although each category contains numerous distinct alphabets. Below, it is listed these categories with a common misnomer in quotations and the correct name in brackets. The accompanying pictures give you a glimpse of the various styles and help you find the script you want to learn!
Essential Tools for Beginner Calligraphers
Calligraphy Pens: These are the stars of the show. You can begin with a basic calligraphy fountain pen or a dip pen with a nib holder. Brands such as Pilot, Lamy, and Speedball provide affordable starter kits.
Ink: Depending on your pen, you can choose between bottled ink or ink cartridges. Brands like Winsor & Newton or Higgins offer high-quality, smudge-free ink.
Calligraphy Paper: Regular paper can cause ink bleeding or feathering, so opt for smooth, thicker paper like Rhodia or Strathmore’s calligraphy paper pad.
Guideline Sheets: These pre-printed sheets help guide your writing and are very useful for beginners. Printable versions are available online, or you can purchase a pad from brands like Clairefontaine.
Eraser and Pencil: A simple HB pencil and a non-abrasive eraser are essential for sketching guidelines before you start writing.
Mastering Calligraphy: Learning the Alphabet of Artistic Writing
Imagine the calligraphy alphabet as a new language you’re exploring—it’s not as daunting as it may seem! It’s all about recognizing the distinct shapes and strokes that form each letter.
To start, obtain a calligraphy alphabet guide either online or from calligraphy books. This guide will feature both uppercase and lowercase letters for you to practice.
Take your time to examine each letter closely, paying attention to the curves, angles, and strokes. Note how these letters aren’t just simple lines or curves; they consist of a blend of thin and thick lines that define the elegant style of calligraphy.
A helpful tip: Begin with lowercase letters as they are more commonly used and generally easier to master. Once you feel confident with them, progress to practicing uppercase letters.
Mastering Calligraphy Pen Technique: A Beginner’s Guide
Now it’s time to get hands-on – quite literally! Starting with a calligraphy pen for the first time can be a bit daunting, but don’t let that discourage you. Here’s how you can quickly learn the proper technique for holding a calligraphy pen.
To begin with, avoid holding your calligraphy pen like a regular pen; it requires a different approach. Since calligraphy is about artistry rather than just writing, your grip and angle need adjustment. So, how should you hold it?
Hold the pen at a 45-degree angle to the paper. This positioning allows you to achieve the distinct thin and thick lines that define calligraphy. Ensure your hand remains relaxed throughout; you don’t want cramps interrupting your flow mid-stroke!
Utilize your entire arm to guide the pen, not just your wrist. This technique offers better stroke control and facilitates smooth, flowing lines. Initially, it might feel unfamiliar, but with practice, it will become second nature.
Mastering Calligraphy: Forming Letters
Now that you’ve become proficient with the fundamental strokes, it’s time to advance to forming letters. This stage is where the strokes you’ve practiced begin to transform into elegant, recognizable characters.
Let’s start with the letter ‘a’. Initiate with a delicate upstroke, gently curving it into a ‘c’ shape, then conclude with a bold downstroke. Presto! You’ve successfully penned your inaugural calligraphic letter. How thrilling!
Next, experiment with the letter ‘b’. Begin with a strong downward stroke, followed by a slender upward stroke on the right, gracefully looping around to create a small flourish. There you have it—a new addition to your calligraphy repertoire.
Remember, the key lies not in speed but in precision. Dedicate time to each stroke and curve. Ensure every letter is distinct and well-crafted. You’re not merely writing—you’re crafting art.
Discovering the Art of Calligraphy Styles
Now that you’ve mastered the basics of connecting letters into words, it’s time to explore the diverse world of calligraphy styles. This is your opportunity to unleash your creativity and imbue your writing with a unique flair.
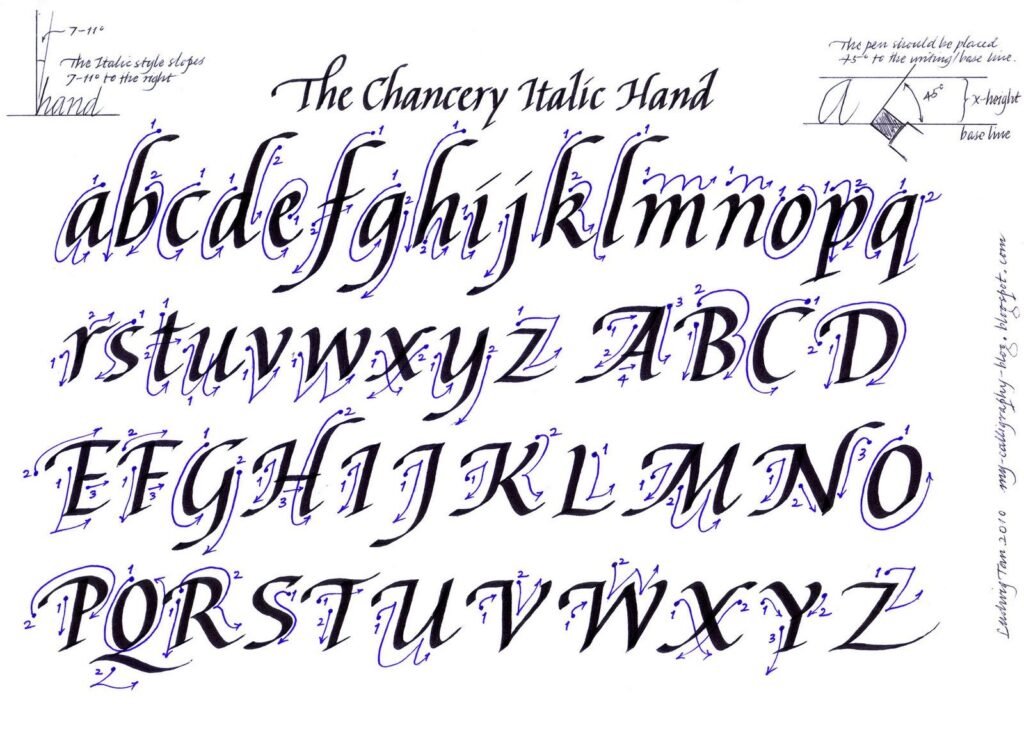
One of the most beloved styles is ‘Italic’. It’s recognized for its graceful slant and readability. To achieve the Italic look, simply tilt your letters slightly to the right as you write. Though it may feel unfamiliar initially, practice will soon make it feel natural.
Another captivating style to experiment with is ‘Gothic’. Gothic calligraphy features intricate letter shapes and bold strokes. Start by emphasizing the downward strokes of your letters and incorporating decorative elements. Remember, the essence lies in exploration rather than achieving perfection.
The realm of calligraphy is vast and rich, offering styles like ‘Copperplate‘, ‘Blackletter‘, and ‘Brush Script‘, each with its own charm. Embrace this opportunity to try different styles until you discover the one that resonates with your artistic sensibilities.
As you delve into calligraphy over the next month, experimenting with various styles will not only refine your skills but also deepen your appreciation for the artistry and diversity within calligraphy. Let your imagination flow freely and enjoy the journey of creative expression!
Mastering Calligraphy Flourishing
Adding Elegance to Your Script Now that you have grasped the fundamentals, let’s explore a more artistic aspect of calligraphy—flourishing. Flourishing involves embellishing your letters with ornate swirls and curves, elevating your calligraphy to a more sophisticated and captivating level. So, how can you begin learning to flourish in calligraphy?
Start by observing examples. Study various instances of flourished calligraphy. Notice how the loops and swirls extend from the letters, their graceful curves and intricate twists. You can find inspiration in calligraphy books, online resources, and social media. This observational phase will acquaint you with the essence of flourishing and illustrate how it enhances calligraphic artistry.
Next, commence practicing on your own. Begin with simple loops and curves. Precision isn’t crucial at this stage; rather, focus on acquainting yourself with the pen and ink, and developing a comfort with creating these decorative strokes. Remember, flourishing emphasizes fluidity and grace, so strive for smooth, flowing hand movements.
Once you feel at ease with basic flourishes, integrate them into your letters and words. Start modestly by incorporating a small loop at the end of a letter or a subtle swirl at the beginning of a word. As your confidence grows, experiment with more intricate and elaborate flourishes to enrich your calligraphy further.
Mastering calligraphy flourishing opens up new dimensions in your artistic expression. It transforms your calligraphy from good to exceptional. However, like any skill, it requires patience and persistence to learn. So, be kind to yourself, continue practicing diligently, and enjoy the journey of artistic discovery.
Culminating Your Calligraphy Journey: Creating Your Own Project
Now that you’ve refined your skills and incorporated stylish flourishes, it’s time to integrate everything into a final masterpiece. Crafting your own calligraphy project offers a fantastic opportunity to apply your newfound knowledge and assess your progress. But where should you begin?
Firstly, determine the type of project that excites you the most. Whether it’s a heartfelt handwritten letter, a charming greeting card, a framed inspirational quote, or any other inspiring idea, the choice is entirely yours.
Next, meticulously plan your project. Sketch out your design, strategically select which letters or phrases will feature flourishes, and carefully choose your ink and paper. Thoughtful planning ensures a polished final outcome.
When you’re ready, dive into the creation process. Take your time, relish each step, and embrace the inevitability of mistakes—they’re invaluable learning opportunities.
Upon completion, take a moment to admire your work. Reflect on how far you’ve progressed since starting your calligraphy journey. Marvel at the intricate letters, the graceful flourishes, and the overall meticulous design. This creation is a testament to your dedication and growth.
Lastly, don’t forget to share your masterpiece. Whether displaying it proudly at home, showcasing it online, or sharing it with friends, sharing your work brings a sense of achievement and may inspire others to embark on their own calligraphy journey.
Creating your own calligraphy project marks the culmination of your month-long exploration into this art form.